How to grout bathroom tiles perfectly
Grout Bathroom Tile DIY Smooth Finish: The Ultimate Professional Guide
Achieving a perfect grout bathroom tile DIY smooth finish transforms your bathroom from amateur to professional-quality in just one weekend project. Many homeowners struggle with uneven grout lines, cracking, and discoloration that ruins an otherwise beautiful tile installation. This comprehensive guide reveals the exact techniques professionals use to create flawless, smooth grout lines that last for years without maintenance issues.
Table of Contents
- Why grout bathroom tile DIY smooth finish Matters
- Step-by-Step grout bathroom tile DIY smooth finish Guide
- Best grout bathroom tile DIY smooth finish Options
- Pro Tips for grout bathroom tile DIY smooth finish
- Common Mistakes to Avoid
- Key Takeaways
- Frequently Asked Questions about grout bathroom tile DIY smooth finish
- Conclusion
Why grout bathroom tile DIY smooth finish Matters
The difference between a professional-looking bathroom renovation and an obvious DIY project often comes down to the quality of the grout work. A perfectly executed grout bathroom tile DIY smooth finish creates seamless transitions between tiles, prevents water infiltration, and provides the structural integrity your tile installation needs to withstand daily use and moisture exposure.
Poor grouting techniques lead to numerous problems that can cost thousands in repairs. Uneven grout lines collect dirt, soap scum, and bacteria, creating unsanitary conditions and unsightly staining. Cracked or improperly sealed grout allows water to penetrate behind tiles, leading to mold growth, tile loosening, and potential structural damage to your walls.
Professional grouting creates a waterproof barrier that protects your investment while maintaining the aesthetic appeal of your tile work. When done correctly, smooth grout lines enhance the overall design by creating clean, consistent spacing that draws attention to your beautiful tile selection rather than obvious installation flaws.
The key to achieving professional results lies in understanding proper mixing ratios, application techniques, and timing. Temperature, humidity, and grout type all affect the final outcome, making it essential to follow proven methods that account for these variables. With the right approach, your DIY project can rival professional installations at a fraction of the cost.

Step-by-Step grout bathroom tile DIY smooth finish Guide
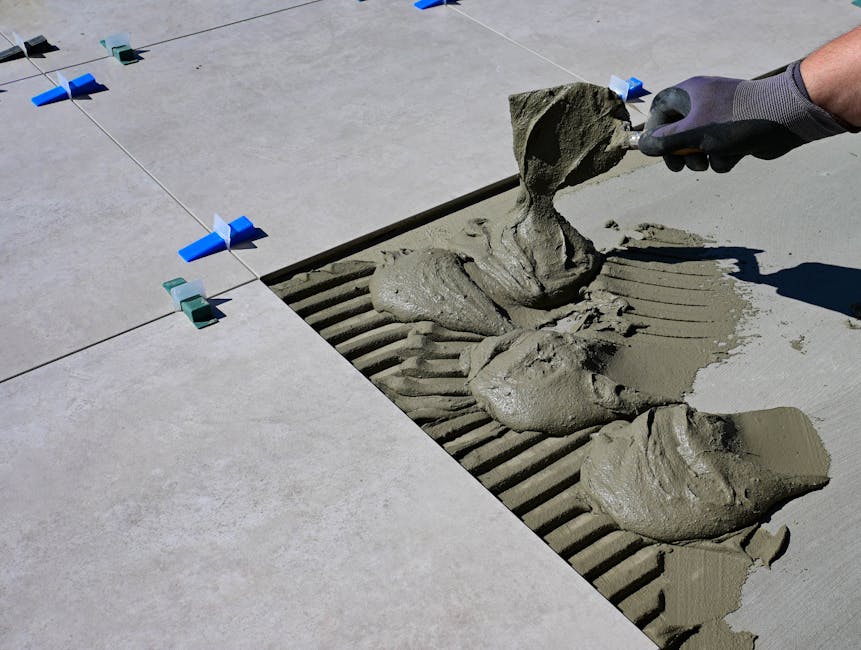
Begin your project by thoroughly cleaning all tile surfaces and removing any old grout or debris from joints using a grout removal tool. Mix your grout according to manufacturer specifications, achieving a consistency similar to thick peanut butter that holds its shape without being too dry or wet. Work in small sections to prevent the grout from setting before you can properly tool the joints.
Apply grout using a diagonal sweeping motion with your grout float, pressing firmly to ensure complete joint filling without air pockets. Remove excess grout from tile surfaces immediately using the edge of your float held at a 45-degree angle. Work systematically across your project area, maintaining consistent pressure and technique for uniform results.
Allow the grout to firm up for approximately 15-20 minutes before beginning the cleaning process with a barely damp sponge. Clean tiles with gentle circular motions, rinsing your sponge frequently to avoid redistributing grout residue. The final step involves tooling joints with a grout shaping tool or your finger to create perfectly smooth, concave grout lines that shed water effectively.

Best grout bathroom tile DIY smooth finish Options
Selecting the right grout type significantly impacts your final results and long-term durability. Epoxy grout provides the smoothest finish and highest stain resistance, making it ideal for high-traffic bathrooms and areas prone to heavy moisture exposure. While more challenging to work with, epoxy grout creates virtually maintenance-free installations that resist cracking and discoloration.
Polymer-modified sanded grout offers an excellent balance of workability and performance for most bathroom applications. This grout type includes additives that improve flexibility and bonding strength while maintaining the smooth finish characteristics desired in professional installations. The polymer modification reduces shrinkage and cracking while providing enhanced water resistance.
Unsanded grout works best for joints narrower than 1/8 inch and produces the smoothest possible finish when properly applied. The fine particle size allows for easier tooling and creates seamless transitions between tiles. However, unsanded grout requires more careful application techniques to prevent shrinkage cracks in wider joints.
Consider pre-mixed grouts for smaller projects where consistency and convenience outweigh cost considerations. These products eliminate mixing variables and provide reliable results for DIY applications. While more expensive per square foot, pre-mixed options reduce waste and ensure proper water-to-grout ratios that affect final smoothness and durability.

Pro Tips for grout bathroom tile DIY smooth finish
Temperature control plays a crucial role in achieving smooth, professional results. Work in temperatures between 65-75°F with moderate humidity levels to ensure proper curing without premature drying that causes surface cracking or poor adhesion. Use fans to maintain air circulation while avoiding direct airflow that accelerates surface drying.
Timing your cleaning phases prevents the most common grouting mistakes that ruin smooth finishes. Begin initial cleaning when grout feels firm to light finger pressure but hasn’t fully hardened. Perform final cleaning with clean water and minimal pressure to remove haze without disturbing joint surfaces. Allow proper cure time before applying sealers or exposing to moisture.
Use proper lighting during application and cleaning phases to identify imperfections while they’re still correctable. Position work lights at angles that reveal joint consistency and surface smoothness. Address any irregularities immediately rather than hoping they’ll be less noticeable after drying.
Maintain consistent joint depths throughout your project by using spacers and checking alignment frequently. Uneven depths create shadows and visual inconsistencies that detract from professional appearance. Mark reference points on walls to maintain consistent grout line heights across large areas.
Common Mistakes to Avoid
Rushing the cleaning process represents the most frequent error that ruins otherwise good grouting work. Cleaning too early removes grout from joints, while waiting too long makes removal extremely difficult and can scratch tile surfaces. Test grout firmness in inconspicuous areas before beginning full cleaning procedures.
Using dirty sponges or water redistributes grout particles across tile surfaces, creating persistent haze that requires aggressive removal techniques. Change water frequently and use multiple sponges to maintain cleaning effectiveness. Rinse sponges thoroughly between uses and wring out excess water to prevent joint washout.
Incorrect grout consistency causes numerous application problems including poor adhesion, excessive shrinkage, and difficulty achieving smooth finishes. Too wet grout slumps in joints and creates weak installations, while overly dry grout won’t compress properly and leaves voids. Mix small batches and adjust consistency as environmental conditions change.
Neglecting proper curing procedures compromises grout strength and durability regardless of application quality. Protect newly grouted areas from rapid moisture loss using plastic sheeting or damp towels during the first 24 hours. Avoid premature exposure to water or cleaning chemicals that interfere with proper chemical curing.
Key Takeaways
- Choose the right grout type based on joint width and expected moisture exposure for optimal smoothness and durability
- Maintain proper consistency and timing throughout mixing, application, and cleaning phases to ensure professional results
- Use quality tools designed specifically for grouting applications to achieve consistent joint profiles and smooth finishes
- Control environmental factors including temperature, humidity, and air circulation during application and curing periods
- Practice proper cleaning techniques with frequent water changes and multiple sponges to prevent surface haze and joint washout
Frequently Asked Questions about grout bathroom tile DIY smooth finish
Q: What is the best grout bathroom tile DIY smooth finish technique for beginners?
A: Start with polymer-modified unsanded grout for joints under 1/8 inch, as it provides the easiest working characteristics while delivering smooth professional results. Work in small sections, maintain proper grout consistency, and focus on timing your cleaning phases correctly. Practice on a sample area first to develop your technique before starting the main installation.
Q: How do I use grout bathroom tile DIY smooth finish methods with different tile types?
A: Natural stone tiles require specialized grout and sealing procedures, while ceramic and porcelain tiles offer more flexibility in grout selection. Always test grout compatibility in an inconspicuous area first. Use appropriate cleaning methods for each tile type and avoid acidic cleaners that can damage natural stone surfaces during the grouting process.
Q: How long should I wait between grouting and sealing for optimal smoothness?
A: Allow grout to cure completely for 24-72 hours depending on type and environmental conditions before applying sealers. Premature sealing traps moisture and can cause discoloration or bonding problems. Test cure completion by checking that grout feels firm and shows no color variations from moisture content.
Q: Can I repair grout lines that aren’t smooth without redoing the entire project?
A: Minor imperfections can often be corrected by carefully removing affected grout and reapplying fresh material. Use a grout saw or manual removal tools to avoid damaging surrounding areas. Match existing grout color carefully and blend repair areas with surrounding joints using proper tooling techniques.
Q: What tools are essential for achieving professional-quality smooth grout lines?
A: Essential tools include a high-quality grout float, large tile sponges, clean buckets for mixing and cleaning, grout shaping tools, and proper lighting for inspection. Invest in professional-grade tools that maintain their effectiveness throughout the project rather than cheaper alternatives that may compromise your results.
Conclusion
Mastering the art of grouting transforms your bathroom renovation from amateur to professional quality with attention to detail and proper technique. Following these proven methods for achieving a perfect grout bathroom tile DIY smooth finish ensures your project delivers lasting beauty and performance that rivals professional installations. Take your time with each step, invest in quality materials and tools, and don’t rush the critical timing elements that determine final results.
Recommended Products on Amazon
As an Amazon Associate I earn from qualifying purchases.