How to install laminate flooring yourself
Install Laminate Flooring DIY Beginner Guide: Complete Tutorial 2025
This comprehensive install laminate flooring DIY beginner guide will walk you through every step needed to transform your floors like a professional contractor. Installing laminate flooring yourself can save thousands of dollars while giving you the satisfaction of completing a major home improvement project. Whether you’re tackling your first flooring project or looking to upgrade your skills, this tutorial covers everything from preparation to finishing touches.
Table of Contents
- Why Install Laminate Flooring DIY Beginner Guide Matters
- Step-by-Step Install Laminate Flooring DIY Beginner Guide
- Best Install Laminate Flooring DIY Beginner Guide Options
- Pro Tips for Install Laminate Flooring DIY Beginner Guide Success
- Common Mistakes to Avoid
- Key Takeaways
- Frequently Asked Questions about Install Laminate Flooring DIY Beginner Guide
- Conclusion
Why Install Laminate Flooring DIY Beginner Guide Matters
Learning how to install laminate flooring yourself offers incredible value for homeowners looking to upgrade their living spaces without breaking the budget. Professional installation can cost $3-8 per square foot in labor alone, while DIY installation requires only the cost of materials and tools. For a typical 500 square foot room, this translates to savings of $1,500-4,000 in labor costs.
Modern laminate flooring has revolutionized the DIY market with click-lock systems that eliminate the need for glue, nails, or special equipment. These engineered systems allow planks to snap together seamlessly, creating a floating floor that expands and contracts naturally with temperature changes. The installation process has become so user-friendly that most homeowners can achieve professional-looking results with basic tools and careful attention to detail.
Beyond cost savings, DIY installation gives you complete control over timing, quality, and attention to detail. You can work at your own pace, ensuring each plank is perfectly aligned and properly secured. This hands-on approach often results in superior craftsmanship compared to rushed professional jobs, as you’re investing personal pride in the outcome.
The skills you develop during your first laminate installation will serve you well for future projects throughout your home. Understanding subfloor preparation, moisture barriers, and expansion gaps provides valuable knowledge for maintaining and upgrading your floors over time. Many homeowners find the process so rewarding that they continue tackling additional rooms and even help friends and family with their flooring projects.
Step-by-Step Install Laminate Flooring DIY Beginner Guide
Starting your laminate flooring project requires careful preparation and the right approach to ensure professional results. Begin by measuring your room accurately, adding 10% extra material to account for cuts and potential mistakes. Remove all furniture and existing flooring, then inspect the subfloor for squeaks, loose boards, or uneven areas that need attention before installation.
Subfloor preparation is crucial for long-term success and involves checking for level using a 6-foot straight edge. Any variations greater than 3/16 inch over 10 feet must be corrected using floor leveling compound or sanding high spots. Clean the subfloor thoroughly, removing all debris, nails, and staples that could interfere with the new installation.
Install your moisture barrier or underlayment according to manufacturer specifications, ensuring seams are properly taped and edges run up the walls about 1/4 inch. This barrier protects your laminate from moisture while providing cushioning and sound reduction. Start your first row along the longest, straightest wall, maintaining a consistent 1/4 to 1/2 inch expansion gap around all perimeters.
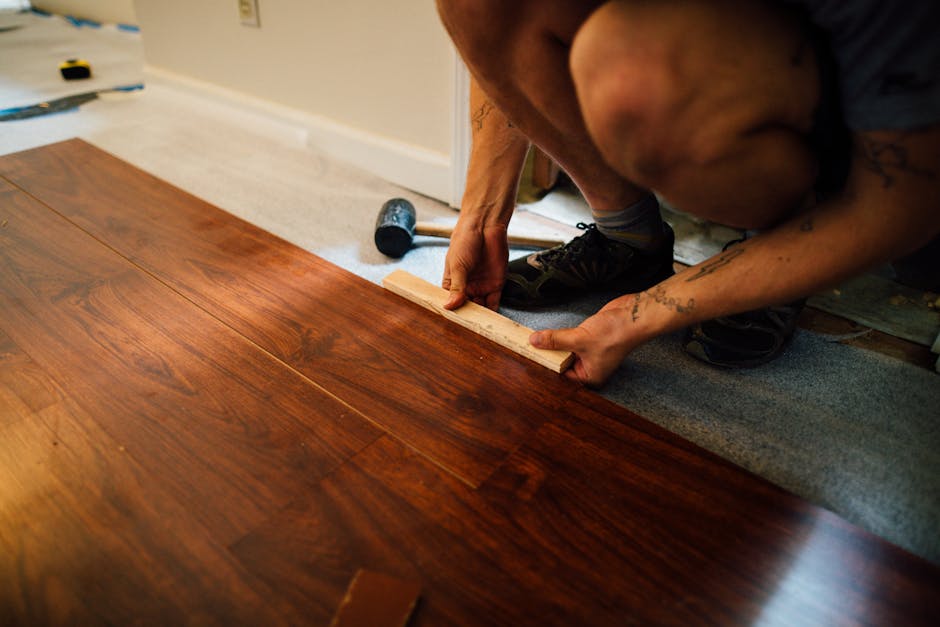
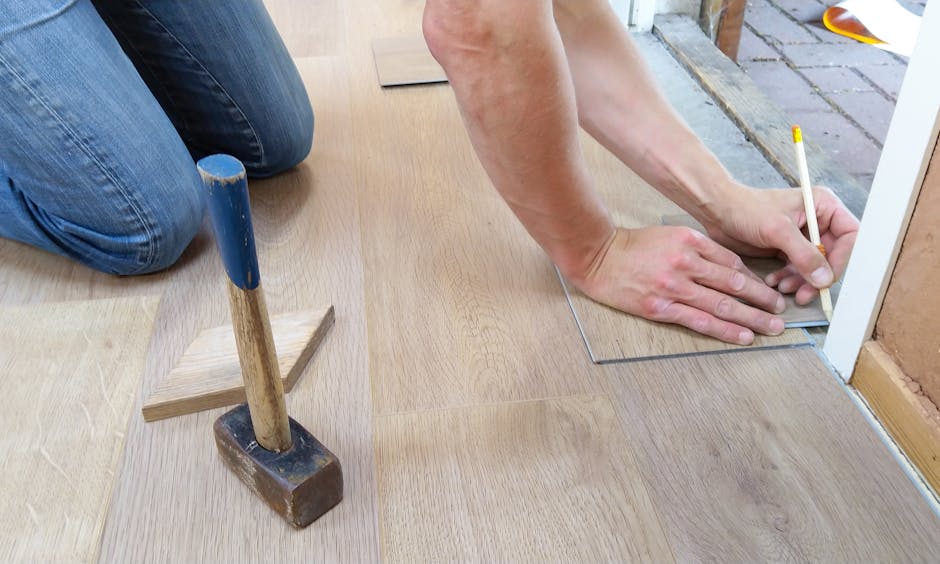
The installation process involves connecting each plank at a slight angle, then lowering it until the click-lock mechanism engages. Work from left to right, staggering joints by at least 12 inches between rows for optimal stability and appearance. Use a tapping block and pull bar for tight connections, especially in corners and tight spaces where access is limited.
Complete each row before starting the next, checking for gaps and ensuring all connections are secure. The last row typically requires rip cuts to fit the remaining space, minus your expansion gap. Install transition strips, quarter round molding, and baseboards to cover expansion gaps and create a finished appearance that rivals professional installations.
Best Install Laminate Flooring DIY Beginner Guide Options
Choosing the right laminate flooring products and tools significantly impacts your installation success and long-term satisfaction. Premium laminate brands like Pergo, Shaw, and Mohawk offer superior click-lock systems designed specifically for DIY installation, with detailed instructions and customer support. These manufacturers provide comprehensive install laminate flooring DIY beginner guide resources including video tutorials, troubleshooting guides, and technical specifications.
Thickness plays a crucial role in both durability and installation ease, with 8mm to 12mm planks offering the best balance of stability and value. Thicker planks resist denting and provide better sound insulation, while their additional weight helps the floating floor system remain stable. Look for AC3 or higher wear ratings for residential applications, ensuring your investment will withstand normal household traffic for decades.
Underlayment selection depends on your subfloor type and specific needs, with combination products offering moisture protection and sound dampening in one convenient roll. Foam underlayments work well over concrete, while cork options provide superior sound reduction for upstairs installations. Some premium laminate products include attached underlayment, simplifying installation while ensuring optimal performance.
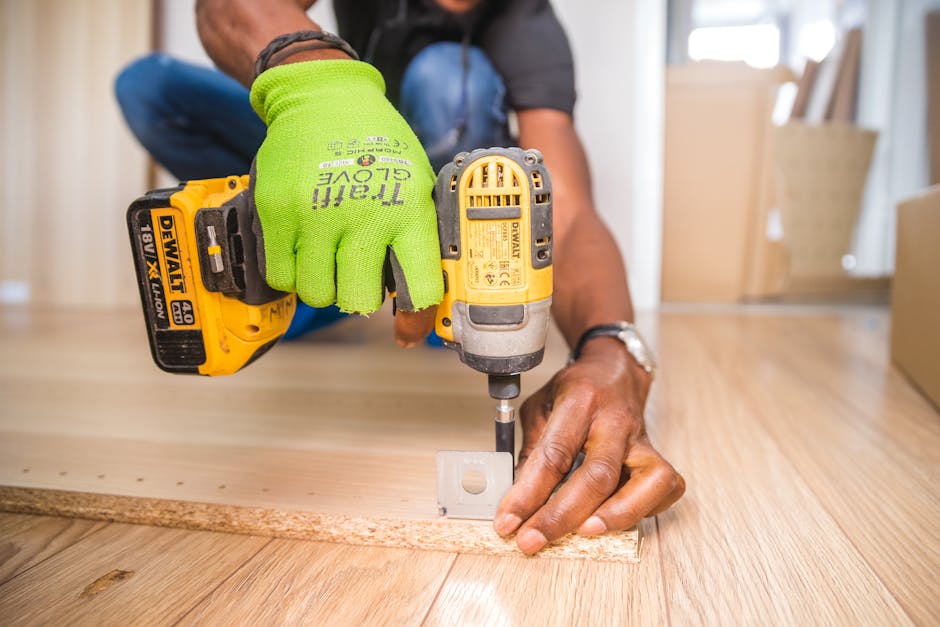
Tool quality directly affects installation speed and results, making it worthwhile to invest in proper equipment or rent professional-grade tools. Essential tools include a circular saw or miter saw for cuts, tapping block, pull bar, spacers, and measuring tools. A pneumatic flooring nailer isn’t necessary for click-lock systems, but a quality saw with a fine-tooth blade ensures clean cuts that fit perfectly.

Pro Tips for Install Laminate Flooring DIY Beginner Guide Success
Professional installers use specific techniques that separate amateur work from expert results, and incorporating these methods into your project ensures superior outcomes. Acclimate your laminate flooring in the installation room for 48-72 hours before beginning, allowing the material to adjust to local temperature and humidity conditions. This prevents excessive expansion or contraction after installation that could cause gaps or buckling.
Plan your layout carefully before cutting the first plank, ensuring your final row will be at least 2 inches wide to maintain structural integrity and appearance. Snap chalk lines parallel to your starting wall to keep rows straight, especially important in rooms that aren’t perfectly square. Most rooms have some irregularities, so don’t assume walls are straight or corners are exactly 90 degrees.
Create a cutting station in another room or outside to minimize dust and debris in your work area. Make all cuts with the decorative side face-down to prevent chipping, using painter’s tape over cut lines for extra protection on visible surfaces. Keep cut pieces organized by size, as shorter pieces from one row often work perfectly to start the next row while maintaining proper stagger patterns.
Work systematically and avoid rushing, taking breaks to step back and assess your progress regularly. Small alignment issues become major problems if not corrected early, so maintain consistent expansion gaps and check that rows remain parallel every few courses. Use a moisture meter to check subfloor conditions in basements or areas prone to dampness, as excessive moisture will void most manufacturer warranties.
Common Mistakes to Avoid
Even experienced DIYers make critical errors that compromise their laminate flooring installation, but understanding these pitfalls helps ensure your project succeeds. The most frequent mistake involves inadequate subfloor preparation, with installers rushing to begin laying planks without properly addressing squeaks, high spots, or loose boards. These issues only worsen under the new flooring, creating permanent problems that require complete reinstallation to fix.
Ignoring expansion gaps ranks as the second most common error, with homeowners either making gaps too small or eliminating them entirely for aesthetic reasons. Laminate flooring must have room to expand and contract with seasonal changes, and restricting this movement causes buckling, gaps, or complete floor failure. Always maintain manufacturer-specified gaps around all fixed objects including walls, cabinets, and door frames.
Poor stagger patterns create weak points in the installation that lead to separation and gaps over time. Joints should never align between adjacent rows, with minimum 12-inch offsets providing optimal strength. Many beginners create repetitive patterns that look artificial, so vary your stagger distances while maintaining structural requirements for a more natural appearance.
Inadequate moisture protection in bathrooms, basements, or kitchens causes swelling, warping, and mold growth that destroys both the flooring and subfloor. Even “waterproof” laminates require proper moisture barriers and careful sealing around fixtures. Test subfloor moisture levels before installation and address any sources of excess humidity to protect your investment long-term.

Key Takeaways
- Proper subfloor preparation is absolutely critical for long-term success and prevents 90% of installation problems
- Maintain consistent expansion gaps around all perimeters to allow natural movement and prevent buckling
- Invest in quality tools and materials, as they significantly impact both installation ease and final results
- Take time to plan your layout and stagger patterns before cutting any planks to avoid waste and achieve professional appearance
- Acclimate materials properly and control moisture levels to prevent warping, gaps, and premature failure
Frequently Asked Questions about Install Laminate Flooring DIY Beginner Guide
Q: What is the best install laminate flooring DIY beginner guide approach for first-time installers?
A: The best approach involves thorough preparation, starting with subfloor inspection and leveling, followed by careful material selection and tool gathering. Take your time with each step, watch manufacturer tutorial videos, and don’t hesitate to practice the click-lock system with a few planks before beginning the actual installation. Most successful first-time installers spend as much time preparing as they do installing.
Q: How do I use install laminate flooring DIY beginner guide principles for different room shapes?
A: Adapt basic installation principles by starting with the longest, straightest wall regardless of room shape, and plan your layout to avoid narrow strips at visible edges. In L-shaped rooms, treat each section separately while maintaining consistent expansion gaps. For irregular spaces, create detailed floor plans showing your starting point and progression to minimize cuts and waste.
Q: How long does a typical DIY laminate flooring installation take?
A: Most beginners can install 200-300 square feet per day once they establish a rhythm, with the first day being slower as you learn the process. A typical bedroom takes 1-2 days, while larger living areas might require a weekend. Factor in additional time for subfloor preparation, furniture moving, and finishing work like trim installation.
Q: Can I install laminate flooring over existing floors?
A: You can install laminate over most existing hard surfaces like tile, hardwood, or vinyl, provided the surface is level, clean, and securely fastened. Carpet must always be removed, and any loose or damaged areas need repair first. Check manufacturer guidelines, as some warranties require installation over approved substrates only.
Q: What tools are absolutely essential for DIY laminate installation?
A: Essential tools include a saw for cutting (circular or miter), tapping block, pull bar, spacers, measuring tape, chalk line, and safety equipment. A pneumatic nailer isn’t needed for click-lock systems, but quality cutting tools prevent chipped edges and ensure proper fits. Many home centers rent professional tools if purchasing isn’t cost-effective.
Conclusion
Successfully completing your own laminate flooring installation provides tremendous satisfaction along with significant cost savings and valuable home improvement skills. This install laminate flooring DIY beginner guide has equipped you with professional techniques, common mistake prevention, and practical tips for achieving results that rival contractor installations. Remember that patience and attention to detail matter more than speed, especially for first-time installers. Take pride in your accomplishment and enjoy your beautiful new floors for years to come!
Recommended Products on Amazon
As an Amazon Associate I earn from qualifying purchases.


